|
|
|
|
|

|
U-Boot Enigma
The Enigma M4 was an electro-mechanical cipher machine, developed
during WWII, exclusively for the U-Boot division of the Kriegsmarine
(Germany Navy). It was intended as the successor to the
Enigma M3, which in turn was based on the standard
German Army Enigma.
The Enigma M4 played a vital role in the Battle of the Atlantic
and was introduced completely unexpected on 2 February 1942.
It caused great upset with the allied codebreakers at
Bletchley Park (BP),
who called it the Shark-key. It remained unbroken for 9 months
until new codebooks were captured.
|
Like the other naval machines (M3),
the design is based on the Enigma I,
that was already in use
by the Wehrmacht and Luftwaffe.
The machine has three moving code wheels, a fixed
reflector (UKW) and a Steckerbrett
(plug board).
It was supplied with 8 different coding wheels, (I to VIII),
3 of which were in the machine at any given time. The wiring of wheels I to V
was identical to those of the Enigma I.
Unlike the Army, the Navy choose to have letters (A-Z) on the
circumference of each wheel, rather than numbers (01-26).
The wiring of each wheel is given in the table below.
Besides the 3 extra wheels to choose from, an extra wheel
(Zusatzwalze)
was added to the M4, to the left of the 3 moving wheels. This extra
wheel forms an additional stage in the ciphering process.
The extra wheel is not moved during encypherment and can not
be exchanged with the other three wheels. When the extra wheel
is placed in the A-position, the machine
is compatible with
the 3-wheel
Enigma I
and the Enigma M3.
Two different versions of the extra wheel are known: Beta and Gamma
(see below).
|
|
|
In the U-boats, the Enigma was usually located in the radio
room, although in some cases it was carried out to the
captain's quarters, e.g. in case of a double encipherment
(Sonderschlussel M).
Most U-boats even had two Enigma machines available to
cope with different keys around the switch-over point at
midnight. One Enigma would then be left with the settings
of the previous day, whilst the other one was configured with
the settings for the new day. As some messages were received
with a delay, they could quickly be tried with both keys.
|
The image on the right shows the earlier Enigma M3 (3-wheel
variant) aboard the U-124 in March 1941 [3].
The Enigma machine is located in a recessed bay in the table
and is visible in the bottom left of the picture.
In the enlargement, a power cable
is visible in the corner of the bay. It was used to
supply 4V directly to the machine.
The person in the image is the radio operator. The Enigma was
probably operated by a different person sitting to his left.
To the left of the Enigma is table which might have been used
to (partly) encipher messages (e.g. bigram table).
|
|
|
Behind the back of the radio operator (to the right of the large
radio) is a message form (Funkspruch) that was used by the radio
man to write down received
morse code messages. After reception,
the form was passed to the cipher clerk for decipherment.
A small interesting detail in the above image is the presence
of a domestic Radione receiver in front of the radio operator.
It was probably used for reception of music from regular
broadcast stations.
|
|
|
|
|
|
|
Below is the simplified circuit diagram of the M4. It is similar
to the circuit diagram of the Enigma I
(or the M3 for that matter),
but has an extra coding wheel at the left (4).
If you don't understand how the Enigma works, you might want to
read about the working principle first.

| |
|
Simplified circuit diagram of the Enigma M4
|
The M4 is in fact a modified 3-wheel machine. The width of the
UKW has been halved and the remaining space is taken up by
the 4th wheel, which has spring-loaded contacts at either side.
As it is thinner than the other wheels, it is sometimes called
the thin wheel.
It is also referred to as the Griechenwalze (Greek wheel) as it was
identified with the Greek letter Beta or Gamma.
The official name for the 4th wheel was Zusatswalze (additional
wheel).
|
Whereas the Enigma machines of the German Wehrmacht and
Luftwaffe were supplied with 5 cipher wheels, all Naval
machines had 8 wheels to choose from. The first five wheels
(I-V) were identical to the five wheels supplied to the rest of the
Army, allowing some level of compatibility,
but the additional three wheels (VI-VIII) were used
exclusively by the Kriegsmarine (Navy).
Of the 8 wheels supplied with the Enigma M4, three would be placed
in the machine at any time, subject to the current key settings.
Although 3-of-8 wheels theoretically gives a total number of wheel
orders of 336 (8 x 7 x 6), this was limited in practice by the operational
procedures. There were instruction that one of the 3 wheels in the
machine had to be an extra wheel (VI-VIII) and that a particular
extra wheel could not be used in the same position on two successive days.
|
The remaining 5 (unused) wheels were stored in a special
wooden box. The image on the right shows such a box with the
unused wheels in it.
The box has space for 7 wheels but only 5 positions were used.
The remaining positions were probably meant for a future
extra wheels or to store additional gadgets, such as UKW-D.
More pictures of this box below.
Click any of the images to enlarge. Note that the serial number
of the wheels is present on the box' ID-plate and is also engraved
in the lock of the wooden box.
|
|
|
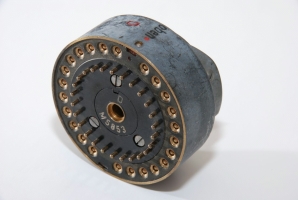
Wheels I to V each have one turnover notch, but the three extra
Naval wheels (VI-VIII) each have two notches.
This was done to generate more frequent wheel-turnovers and, hence,
make wheel stepping less predictable. The problem however,
is that the cipher period is reduced, as 26 (letters) is dividable
by 2 (notches).
As you can see in the images below, these
two notches are positioned
opposite each other. Details of the wheels wiring can be found
in the table below.
The construction of the Naval wheels is different from other
Enigma wheels. Rather than using a spring-loaded pin to set the
Ringstellung (common on all other wheels), the user has to press
two pawls simultaneously.
Furthermore, the wheels are marked with the 26 letters of the
alphabet (A-Z) rather than numbers (01-26).
The overall dimensions of the wheels are identical however.
|
|
|
|
|
|
|
Although the commercial machine had 4 wheels protruding the
top lid, it was in effect a 3-wheel machine with a settable
reflector (UKW).
The Enigma M4 however, has an extra cipher wheel to
the left of the 3 normal coding wheels, which is why it is the
only Enigma machine that can truly be called a 4-wheel machine.
The additional 4th wheel was called the Zusatzwalze (extra wheel) or
Griechenwalze (Greek wheel) as it was identified with the
Greek letter Beta
or Gamma.
|
The problem with the Zusatzwalze however, was that it could
not be picked from the total set of 8 wheels. In other words:
it could not be swapped with the other wheels. The reason
for this is that it was constructed differently. It is narrower
that the others and has spring-loaded contacts at either side.
Likewise, the UKW was smaller and had 26 flat-faced contacts,
rather than pins.
Furthermore, the wheel is not driven by the other wheels.
In other words: it is never moved during encipherment.
In fact, together with the UKW, it is just a selector for 26
different UKWs.
|
|
|
Initially, only one Zusatzwalze (Beta) was supplied together
with a thin version of UKW B.
The UKW and the Zusatzwalze were wired in such a way that
when the Zusatzwalze was set to the A-position the combination
(Beta + UKW B) was compatible with UKW B on the
Enigma I
and M3.
|
|
|
|
|
|
|
Later in the war, probably in July 1943, a new set was supplied
consisting of UKW C and Zusatzwalze Gamma.
If both Beta and Gamma were present with a machine, another
wooden box was used to store the unused UKW and Zusatzwalze.
Although the Gamma-wheel was not distributed as widely as
the Beta-wheel, it was used on some networks until the end of
World War II.
The reflectors were only changed once a month.
It was technically possible to mix the wheels of the two sets,
i.e. use UKW-B with Gamma or UKW-C with Beta, and
according to Mahon [7] this was done on several occasions.
Below an overview of the combinations that have been recorded by
Mahon between June 1943 and April 1945. B and C are the thin reflectors (UKW),
whilst β and γ represent the Zusatzwalze (ZW) Beta and Gamma.
|
|
Year
|
Month
|
UKW
|
ZW
|
Remark
|
|
|
|
1943
|
June
|
B
|
β
|
|
|
|
July
|
C
|
γ
|
|
|
|
August
|
B
|
γ
|
|
|
|
September
|
C
|
β
|
|
|
|
October
|
B
|
β
|
|
|
|
November
|
B
|
γ
|
|
|
|
December
|
C
|
γ
|
|
|
|
|
1944
|
January
|
C
|
β
|
|
|
|
February
|
B
|
β
|
|
|
|
March
|
C
|
γ
|
|
|
|
April
|
B
|
γ
|
|
|
|
May
|
C
|
β
|
|
|
|
June
|
C
|
γ
|
|
|
|
July
|
B
|
β
|
|
|
|
August
|
B
|
γ
|
|
|
|
September
|
C
|
γ
|
|
|
|
October
|
B
|
β
|
|
|
|
November
|
C
|
β
|
|
|
|
December
|
B
|
γ
|
|
|
|
|
1945
|
January
|
C
|
γ
|
|
|
|
February
|
B
|
β
|
|
|
|
March
|
B
|
γ
|
|
|
|
April
|
C
|
β
|
|
|
Please note that althoug the Zustzwalze can be set to any position,
it does not move during the ciphering process. In other words:
it can't be moved by the wheel to the right of it. This could be
considered a weakness as it limits the possible number of permutations
of the entire system. The combination UKW+Zusatzwalze can
be regarded as a selector between 26 different UKWs.
Another weakness of the wheelturnover mechanism is that the wheels
move regularly. Only after the rightmost wheel has completed a
full revolution, does it cause the next wheel to make a single step.
As a result, the 2nd wheel (from the right) will only make one step
every 26 characters and the 3rd wheel will hardly ever move.
This makes the cipher period predictable and easier to break.
The only machine that did not suffer from regular stepping was
the Enigma G (Zählwerkmaschine).
|
The three extra wheels (VI, VII and VIII) have two notches each,
which causes a more frequent wheel turnover and less regular stepping.
This was done as the 3rd wheel (from the right) hardly ever moved
during the ciphering process.
Note however, that the wheels have 2 notches which is not a
relative prime of 26 (26 can be divided by 2) and that the notches
are positioned oposite each other
(see the image on the right).
The result is that the cipher period is effectively halved,
which was yet another weakness of the system; a bonus
for the codebreakers.
|
|
|
Furthermore, operational procedures instructed the use of at least one
of the extra 3 Naval wheels (VI-VIII) every day, and that such a
wheel could not be used in the same position on two successive days.
This was known by the code breakers at
Bletchley Park
and reduced the number of possible permutations.
In fact, it made guessing the wheel-order easier.
|
During WWII, several attempts were mounted to make Enigma traffic more
secure. In January 1944, a field-rewirable reflector,
called UKW-D,
was introduced by the Luftwaffe (German Air Force).
It is little known that an UKW-D was also developed for the Kriegsmarine
(Navy).
|
The image on the right shows an extremely rare UKW-D with a serial number
starting with the letter M, indicating Naval-use (Marine).
It was developed especially for the M4 machine, and could possibly also
be used on the M3.
When in use, it would replace both the reflector (UKW) and the extra wheel
(Zusatzwalze). The letter D is engraved in the body of UKW-D at such a
position that it can be seen through the leftmost window of the Enigma's cover.
 More information More information
|
|
|
|
The Enigma M4 has a lock in the top cover that can be used to prevent the wheel
settings from being changed. This was probably done to allow only an officer
to change the wheel settings. The Enigma M3 even has two
of such locks.
As far as we know, locks were only present on the Enigma machines used by
the Kriegsmarine (Navy).
It is quite possible that the lock was only used in a limited number of
situations, as only very few keys have been found.
|
The image on the right shows an extremely rare key for the Enigma M4.
Note that the machine's serial number is engraved on the key. M4 keys
generally do not match the lock of another M4, but in our case we were lucky;
the key shown here fits the lock of our M4 perfectly, despite the fact that
it has a different serial number.
If no original key is present, it is also possible to have a replica key made
from a so-called blank, even whithout removing and disassembling the
lock. For this, one would need to call the help of a skilled lock-picker,
as we did.
|
|
|
The rightmost four images below show a replica key that was made in 2008 by
Barry Wels
of the Dutch lockpickers organisation Toool.
He used a technique called impressioning and it took him just under
10 minutes to create a smoothly operating key.
More about this on Barry's Weblog.
Another example of an original Enigma M4 key is presented in
image #4 below.
It belongs to Dutch collector Arthur Bauer, who found it in a small paper
bag that was stored in between the Enigma machine and its wooden box.
One day, when cleaning the machine, the bag simply fell out.
His M4 is now on permanent display at the
Churchill War Rooms in London.
|
Below is the wiring for each wheel, the ETW and all known
UKWs. UKW-B was the standard reflector throughout the war and UKW-C
was only temporarily used during the war.
The wiring of the first 5 wheels (I-V)is identical to the wiring of the
5 wheels of the Enigma I used by the Wehrmacht
and Luftwaffe. This allowed secure communication between
the departments.
|
|
Wheel
|
ABCDEFGHIJKLMNOPQRSTUVWXYZ
|
Notch
|
Turnover
|
#
|
|
|
|
ETW
|
ABCDEFGHIJKLMNOPQRSTUVWXYZ
|
|
|
|
|
I
|
EKMFLGDQVZNTOWYHXUSPAIBRCJ
|
Y
|
Q
|
1
|
|
II
|
AJDKSIRUXBLHWTMCQGZNPYFVOE
|
M
|
E
|
1
|
|
III
|
BDFHJLCPRTXVZNYEIWGAKMUSQO
|
D
|
V
|
1
|
|
IV
|
ESOVPZJAYQUIRHXLNFTGKDCMWB
|
R
|
J
|
1
|
|
V
|
VZBRGITYUPSDNHLXAWMJQOFECK
|
H
|
Z
|
1
|
|
VI
|
JPGVOUMFYQBENHZRDKASXLICTW
|
HU
|
ZM
|
2
|
|
VII
|
NZJHGRCXMYSWBOUFAIVLPEKQDT
|
HU
|
ZM
|
2
|
|
VIII
|
FKQHTLXOCBJSPDZRAMEWNIUYGV
|
HU
|
ZM
|
2
|
|
Beta
|
LEYJVCNIXWPBQMDRTAKZGFUHOS
|
|
|
|
|
Gamma
|
FSOKANUERHMBTIYCWLQPZXVGJD
|
|
|
|
|
UKW-B
|
ENKQAUYWJICOPBLMDXZVFTHRGS
|
|
|
|
|
UKW-C
|
RDOBJNTKVEHMLFCWZAXGYIPSUQ
|
|
|
|
|
The three extra wheels (VI, VII and VIII) have two notches each,
which causes a more frequent wheel turnover, but also introduces
another weakness (see above under Wheel turnover).
|
It is sometimes thought that the name M4 was used because the machine
has 4 wheels. The name M4 however, refers to the operating procedure
rather than the machine itself. After M1, M2 and M3, the next one was
logically called M4.
The operating procedure and the setting of the message key of the
Naval machines was far more complex than with the Army and Air Force.
This was one of the reasons why Naval Enigma traffic was much harder
to break than all other Enigma traffic.
The operator would first select a message key from a series of codebooks
and tables. Each message was converted into a series of so-called
short messages which were then translated into letter-groups.
Selecting the message key and converting the message, involved the use
of the following documents:
|
- Schlüsseltafel M Algemein - Innere Einstellung (internal settings)
- Schlüsseltafel M Algemein - Aussere Einstellung (external settings)
- Zuteilungsliste (allotment list)
- Tauschtafelplan (table pointer)
- Kenngruppenbuch (identification groups)
- Doppelbuchstabentauschtafeln (bigram table)
|
From the Kenngruppenbuch the operator selected 2 trigrams (3-letter groups):
|
- Schlüsselkenngruppe (key identifier)
- Verfahrenkenngruppe (encryption identifier, in order to obtain messsage key)
|
The Enigma was then set to the basic position for the day (Grundstellung)
and the operator entered the Verfahrenkenngruppe in order to obtain the
message key. The two trigrams mentioned above
(Schlüsselkenngruppe and Verfahrenkenngruppe)
together were used as the message indicator, which was converted once more
with a bigram table (Doppelbuchstabentauschtafel).
Enigma codebooks are extremely rare and only a few have survived.
Most of these are locked away in the vaults of the NSA.
The image on the right shows the bigram table [4].
|
|
|
In addition to this, the messages from the U-boats, were converted into
smaller messsage using:
|
- Kurzsignalheft (short message book)
- Kenngruppenheft (not to be confused with Kenngruppenbuch)
- Wetterkurzschlüssel (weather reports)
|
This key procedure was called TRITON. Additional keys were used for
confidential communication between the Captain of a U-Boot and U-Boot-Command.
They were called Sonderschlussel M (special key M).
Dirk Rijmenants in Belgium has made a very good description of all
Enigma operating procedures, complete with examples. More details are
available from his excellent website, where
he describes both the
key setting procedure
and the
short message system.
|
|
|
Real M4 message from Dönitz
|
 |
|
|
On 1 May 1045, U-boat Admiral Dönitz issued a message announcing his
appointment as Hitler's successor. This message was part of a total
of 50 messages that were recovered from German
submarine U-543 in 1996 and broken again in 2012
by Michael Hörenberg in Germany [6].
|
The message is of particular historical interest as it was
sent on 1 May 1945, just a day after Hitler committed suicide.
The message was broken again on 20 October 2012.
Click the image for a full description of the message.
Full message description
About the U-534 messages
|
|
|
|
|
|
Differences between M4 and other Enigma machines
|
|
|
|
Looking at an Enigma M4, a number of physical differences with other
Enigma machines can be observed.
The most obvious differences are listed here. Photographic evidence
of each feature can be found at the bottom of the list.
|
- Position of the lock
The lock, that keeps the wooden box closed, is mounted in
the top lid and not in the bottom part as on all other machines.
- Carrying handle
Most M4 machines have a metal carrying grip that is recessed in the
wooden case, whereas most other machine have a leather carrying strap.
Early Naval machines were also issued with a leather strap.
- Removable top lid
The top lid does not have the metal support brackets
that keep it in a stable position when opened. In fact, the top
lid has to rest against, say, a wall or has to be removed completely
when operating the M4. Removal of the top lid is easy as the
M4 only has simple hinges at the rear.
- Metal brackets
Each M4 also has two handles, one at either side of the main body,
that allows the machine to be lifted out of a bay in the U-Boot
radio operator's table.
- Removable lamp panel
The cover of the lamp panel is removable whereas on all other
Enigma machines it is part of the wheel cover. The reason for
this is that on the M4 it was possible to remove all lamps and
replace them with the Schreibmax printer.
- Zusatzwalze (extra wheel)
The M4 is the only machine that has an additional (4th) wheel
that is not interchangeable with the other wheels. For this
reason the machine is often called a 4-wheel Enigma.
See also the description under the heading Zusatzwalze
above.
Check also the comparison between the M4 and
a standard Service Enigma.
- Different plug length on the Steckerbrett
The pins of the plugs (Steckern) on the plugboard are about
4 mm longer that on the Enigma I. Using the plugs of an M4
on the Steckerbrett of an Enigma I will cause permanent
damage. The reason for this difference is unknown. For the
same reason, the Enigma Uhr can't be used
on an Enigma M4.
- Power socket
First of all the battery inside the M4 has a different size.
It is about half the size of the battery used in the other Enigma
machines. Furthermore is has a connector that can be connected
directly to the 4 Volt line of a vessel or U-Boot.
|
|
|
|
|
|
|
- Arthur Bauer, Foundation for German Communication and related technologies
Original key for Enigma M4.
- Arthur Bauer, Funkpeilung als alliierte Waffe gegen Deutsche U-Boote 1939-1945.
ISBN: 3-00-002142-6
- Deutsches Bundesarchiv (German Federal Archive), Bild 101II-MW-4222-02A
Dietrich, Lorient (France), U-Boot U-124, 9 March 1441.
Retrieved from Wikimedia Commons.
- Doppelbuchstabentauschtafeln für Kenngruppen
Bigram substitution table for Message Indicators.
Crypto Museum #300356. 1
- Oberkommando der Kriegsmarine, Der Schlüssel M, Verfahren M Allgemein
Operating procedure for Naval Enigma. Berlin 1940.
Crypto Museum #300359. 1
- Michael Hörenberg, Breaking German Navy Ciphers
Breaking messages from the U-534. July 2012.
- A.P. Mahon, The History of Hut Eight 1939 - 1945
GC&CS Official History. PRO HW 25/2. p. 104.
|
-
Document kindly supplied by Arthur Bauer [1].
|
|
|
|
Any links shown in red are currently unavailable.
If you like this website, why not make a donation?
© Copyright 2009-2013, Paul Reuvers & Marc Simons. Last changed: Sunday, 09 February 2014 - 12:03 CET
|
 |

|
|


![Enigma M3 in U-Boot U-124. Photograph courtesy German Federal Archive [3]. Click to enlarge.](img/enigma_u124.jpg "Enigma M3 in U-Boot U-124. Photograph courtesy German Federal Archive [3]. Click to enlarge.")


")

")


")
")


")

